Farmhouse coffee table are not actually quite smooth or thin. Rather they’re somewhat stout yet that is most certainly part of their appeal and style. This specific plan takes advantage of it as you can see with your own eyes. The initial step of the task is to construct the sides of the base which incorporate these enlivening X sheets that add detail to the entire piece.
When the sides are done you can feel free to interface them by adding the base rack after which it’s an ideal opportunity to gather and introduce the top, finishing the design of the farmhouse coffee table,. At the end you can work on that flawless bothered completion highlighted on gold coffee table handcrafted safe house.
Devices Needed
- Miter Saw – I utilize a Dewalt Miter Saw – A round saw will work on the off chance that you don’t have a miter saw
- Orbital Sander
- Sanding Block
- Drill – I utilize a Dewalt
- Kreg Jig – My #1 instrument in the shop (Makes Pocket Holes)
Supplies
- 120 and 220 Grit sandpaper for Orbital Sander
- 400 Grit sandpaper for sanding block
- Semi-Gloss Polyurathane
- Vinegar/Steel Wool – Optional for a troubled completion
- Stain – I utilized Walnut Minwax
- Several Brushes
Shopping List
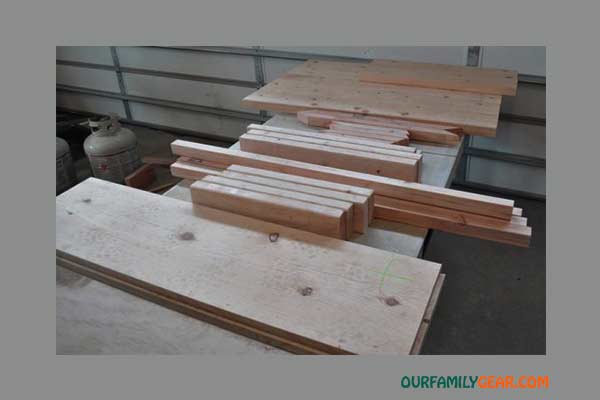
Timber
QTY
- 4 2×6 x 8 foot long Pine Boards for top
- 2 2×4 x 8 foot long Pine sheets for legs and end upholds
- 3 2×2 x 8 foot long Pine Boards for side cots
- 1 1×12 x 8 foot long Pine Board for lower rack
Cut List
QTY
- 5 – 2×6 41″ long for top
- 2 – 2×6 29″ for breadboards – Trim in later advance to around 27 or 27.5″
- 4 – 2×4 16 1/2″ long for legs
- 2 – 1×12 41″ for rack
- 4 – 2×2 41″ side rails (upper and lower)
- 4 – 2×4 22 1/2″ end rails
- 2 – 2×2 22 1/2″ – the two closures cut at 60 Degree Angle – See video for nitty gritty guidelines
- 4 – 2×2 11 1/4″ – 60 degree plot for outside end and 30 degree plot for inside end
- 1 box 2 1/2″ Kreg Screws
- 1 box 1/4″ Kreg Screws
- 16 – 2 1/2″ wood screws for appending base to table top
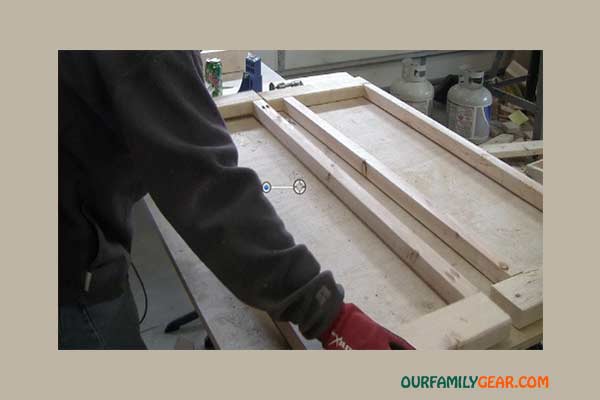
Stage 1: Assemble Farmhouse Coffee Table Side

In the first place, you will gather the different sides of the foot stool by appending 2×4 supports to 4x4s. You will gather the sheets into one spot utilizing a Kreg Jig and with pocket Hole Screws to connect alongside wood Glue. There ought to be a 2″ dividing from the 2×4 support and the floor. In the wake of completing this progression, you ought to have two collected sides for the DIY farmhouse coffee table base.
Stage 2: Add Decorative X Boards

Then, you will join the enlivening x sheets to the gathered sides of the foot stool. You will join the calculated 4×4 supports to the gathered farmhouse coffee table utilizing pilot openings and wood screws. You will rehash this progression for the opposite side of the foot stool base.
Stage 3: Create Coffee Table Base
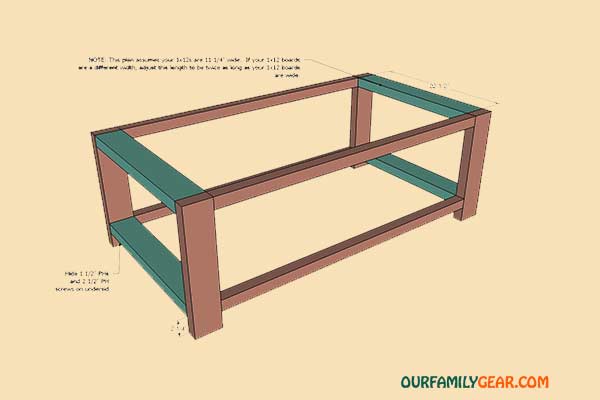
Then, you will start shaping the base by connecting the different sides together. In the first place, you will collect the base rack by connecting the three 2x8s together utilizing rolls alongside wood stick.
The base rack ought to be torn to coordinate with the length of the 2×4 cot on the farmhouse coffee table sides. You will then, at that point connect the base rack to the base 2×4 supports on the two base sides utilizing a Kreg Jig and pocket Hole Screws to join alongside wood stick.
Stage 4: Assemble and Attach Top

Then, you will collect and join the table top for your foot stool. To collect the foot stool top you will append 2x10s together utilizing a bread roll joiner and rolls to stick up the farmhouse coffee table top. You may likewise utilize a Kreg Jig K4 Pocket Hole System on a 1/2″ setting, with 2 1/2″ Pocket Hole Screws to join alongside wood stick for additional help.
Then, you will join the 2×10 bread sheets to the collected 2x10s utilizing wooden dowels to append alongside wood stick.
When your table top is collected, you will join the round farmhouse coffee table top to the gathered foot stool base utilizing wood screws and Tabletop Z cuts clasp.
furthermore, the writing is on the wall! You should now have a completed DIY Farmhouse Coffee Table.
Part 2 – Finishing
Stage 1 – Sand
Utilize an orbital sander and 120 coarseness sandpaper to smooth the table. Sand the top and base.
Stage 2 – Distress table with apparatuses
Imprint the table up with different devices to give the farmhouse coffee table person. I like to utilize a sledge and a little bit to poke holes in the top that take after worm openings (see Episode 3 – Part 2 video). You can likewise run a round saw cutting edge across to give it individual saw marks (without it being connected). Mallets, scratching devices, fasteners, pipe torques, crow bars, and different apparatuses can be utilized to increase the table and give it a one of a kind look. Make a point to keep marks irregular so they look normal and don’t exaggerate the upsetting!
Stage 3 – Use Vinegar/Steel Wool Mixture – Optional
A vinegar and steel fleece blend will trouble your wood and give it to a greater extent a barnwood look. The blend responds with the tannins in the wood to bring out dim and dark tones. It additionally draws out the grain and upsets the wood. The arrangement functions admirably on fir. White pine doesn’t respond also.
Step by step instructions to Make a Vinegar/Steel Wool Solution:
Put a modest bunch of steel fleece in a plastic cup and add vinegar. Try not to cover the holder. Allow it to sit for 24 hours or more. The vinegar will ultimately deteriorate the steel fleece. The more it sits, the more strong the arrangement. To weaken basically add more square farmhouse coffee table white vinegar at whenever.
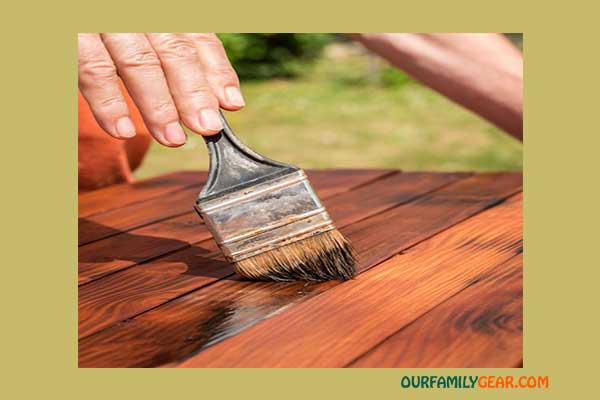
Stage 4 – Stain Table
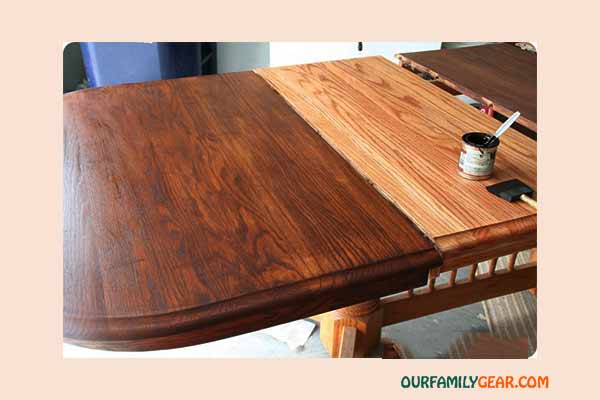
When the vinegar arrangement dries (or then again in the event that you chose not to do the arrangement) you can feel free to stain the undertaking. First utilize a cloth or air blower to eliminate any residue from the farmhouse coffee table . Then, at that point utilize a spotless cloth to apply your preferred mess. Remember to wear gloves and ventilate the region. Have a brush in your other hand to stain hard to arrive at regions.
Stage 5 – Apply Final Coat of Poly
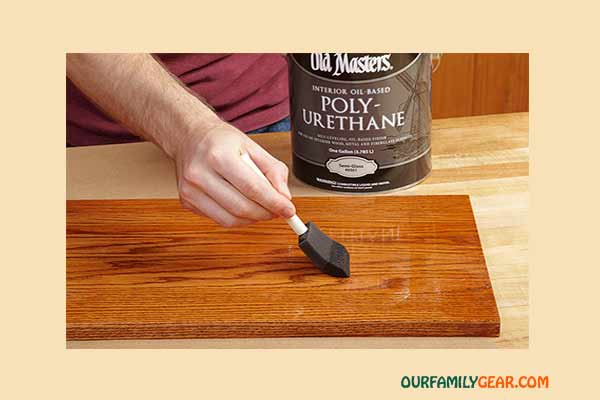
Utilize a perfect cloth to apply the third layer of poly to the farmhouse coffee table top. Utilizing a cloth/fabric will permit the coat to go on smooth and flimsy. Let your table completely dry and afterward move it into your home.
Stage 6 – Sit back and Enjoy!

Unwind, put your feet up, and partake in your new table. It will be an extraordinary discussion piece that will keep going for quite a long time.
If it’s not too much trouble, associate on facebook and post photographs of your own tasks. We’d love to see them! In the event that you’d prefer to begin a site as I did if it’s not too much trouble, look at my DIY Blog video about purchasing an area and setting up a blog or site inexpensively and without any problem. I utilized Bluehost and WordPress to make this site!
Final Word
We have written a great informative content about farmhouse coffee table here. And we have mentioned all the information of farmhouse coffee table. We hope you enjoy this review.
If you like this information, let us know in the comments and stay tuned to get new posts. Thanks.
Related Post
Top rated living room mirrored coffee table set can you buy
The great bamboo coffee table in online Review
How To Buy Home Depot Patio Furniture Sets